Part of the joy of roasting your own coffee at home is in experimenting and improving with every roast.
The best way to measure your roasts and note what changes you made is to keep a roast log. Some use software to help them keep a roast log, which is fancy and easy, but it can be difficult to get set up.
However, there’s a simpler way! You don’t need a new probe, you don’t need any electronics: you just need a pen and paper.
Keeping notes of your roasts will not only help you understand the roasting process better, but it can also act as a database of all the coffees you’ve tried over your career as a home roaster.
In fact, after I wrote that sentence, I went back through all of my old roast logs and found that, as a home roaster, I’ve roasted 117 individual coffees. My roast logs started simple, but as I’ve learned more, I’ve continued to add to what I track, and that in turn has taught me what to watch for. Let’s talk about how to keep a roast log!
Before We Dive In
Here’s a picture of my roast log. I keep it in a notebook full of roast logs and recipes and other life notes. I’m going to explain each bit and why it helps me make better coffee. Please excuse the smudge marks and poor handwriting: I’m left handed and stopped progressing in penmanship at a very early age.

First thing’s First: Name and Date
If I learned anything from 2nd grade, it’s that you need your name and date! Up at the top of your roast log, add the date and the name of the coffee you’re roasting. The more specific you are, the better. If you want add in the processing method, or who the coffee was purchased from, go for it!
Over time, you’ll start to see the names pile up and you’ll be stoked about all the experience you’ve gained.
Weight
Write down the weight of the green coffee going in. I keep a standard charge, which is now at 300g for my Behmor 1600 Plus. I recommend starting with 250g, as you have more control over the roast that way, but at this point in my life, the extra 50 grams is enough to get me and my family through the week, so I sacrifice some control for just getting enough to go week by week.
Keeping your charge weights standard will help make sense of everything below. There’s nothing to glean from your information if your weights are always different. Then you’re just writing down numbers for fun.
A kitchen scale is very helpful here. I highly recommend one for coffee roasting and all other kitchen shenanigans that home coffee roasters tend to get into.
Preheat Time
You should preheat your roaster. Keeping track of how long you preheat helps you standardize your roast procedure and helps keep the variables in your roasts consistent.
Temperature by Time
This isn’t necessary, and I only started doing this about four years into my home roasting career, but it helped me understand a lot more about how to develop a roast style, what a roast profile is, and how subtle changes can affect flavor.
I use a Behmor 1600, so all I have to do is click a button to see the temperature inside the machine. It’s not always accurate, but since I’m always using the same Behmor, the measurement helps keep things standard.
This isn’t really possible in an electric popcorn popper, but I’ve seen people rig up stovetop kettles with a temperature probe. If you’re using an electric popper, just skip this part of the roast log. There’s still plenty of important information to help you get better every roast.
Time at First Crack
Use a timer! Record the time at which first crack really gets going. You can also note here how ‘dense’ the crack is. By that, I mean: did first crack drag out and take a few minutes, or was it fairly compact, with most of the beans cracking within 30-40 seconds?
Time at Second Crack
Will you be bold and take your coffee to second crack? I almost never do, but I put this is for illustrative purposes. And there’s no reason you shouldn’t take your coffee to second crack. Dark roast is delicious.
Drop Temperature
At what temperature did you end your roast? This will also act as a way to gauge roast level long after the coffee has been ground and drunk.
Drop Time
How long did you roast them beans?
Little too acidic? Draw the roast out 30 seconds more next time.
Too dark? Roast 30 seconds less next time.
Compare the roasts side by side. This is where you really begin to learn.
Tasting Notes
Brew Method
Hario V60? Chemex? Moka Pot? Aeropress? Turkish Coffee? Cupping? French Press? Espresso?
If you’re going to get good at roasting, you ought to get good at brewing, too.
Ground Aroma
After you grind your coffee, give it a good smell. Note what aromas there are.
Flavor
As you drink your coffee, do note any particular flavors? The more tasting you do, the more your taste buds change. You get better at tasting subtle differences the more you pay attention.
Body/Acidity Balance
I’ve found this is the most important metric for me in making a great cup of coffee. I like there to be a maximum balance between sweetness/body and acidity. I want to taste all of the unique brightness a coffee has to offer, while also bringing out all of the sugars in the bean as well.
If it’s too acidic, I’ll roast a little longer next time. I’ll make that note here.
If it’s tasting a bit flat, I’ll pull my roast earlier.
Make a Graph
It also helps to visualize your roast in graph form. Check out this graph I made of two roasts: same bean, different styles. In the first roast, I went for as much acidity as I could get by roasting quickly. In the second, I went for a sweeter roast and dragged out the 1st crack. These came out at the same temperature, but with a minute and a half difference!
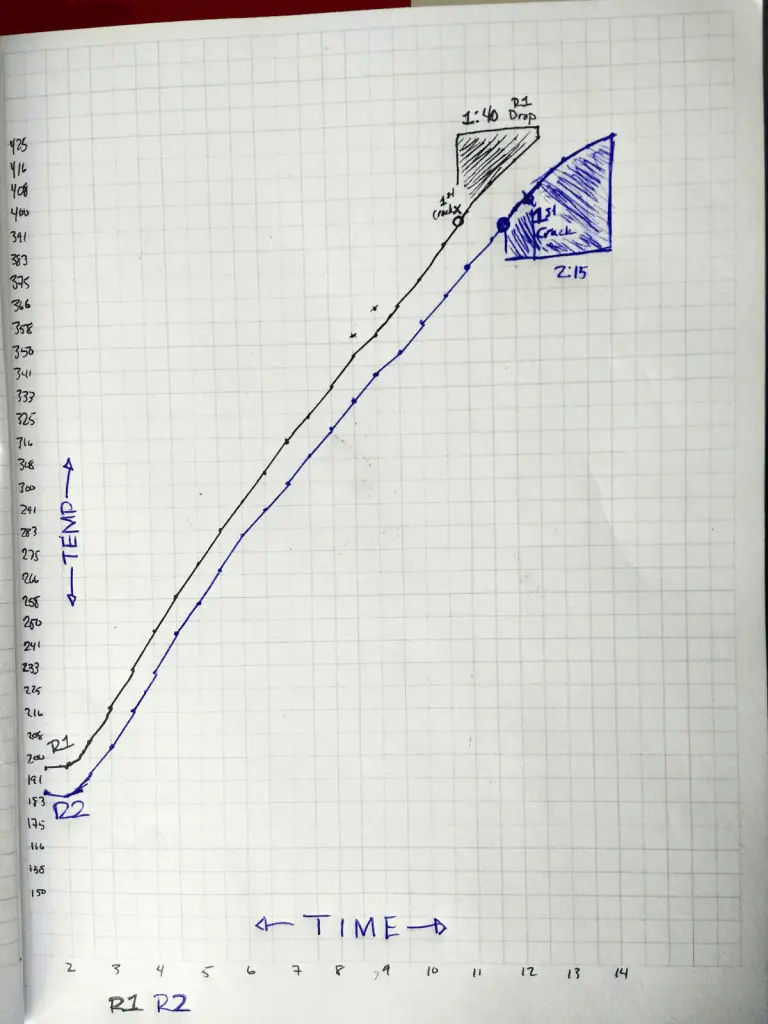
This particular roast was an Ethiopian Natural. Natural coffees, as you know, do better with a little more time to develop the sugars and sweetness. Still, I had a hunch that going for maximum acidity would help boost their inherent fruit flavors.
Wrong!
In tasting these two, the second roast (R2) had more berry flavor that the first roast (R1). Hot dog!
Plotting your roast visually, especially when roasting a coffee more than once, is another way of understanding the chemical reactions that occur during a roast.
For this example, the short time spent between 1st crack and Drop temp wasn’t enough to develop the sweetness that I love in Ethiopians. If I were to roast again, I might even try drawing that out more.
Anything else?
This is just a sample of what I’ve picked up over the years. There are many other factors you can measure when roasting, though these are just the things I’ve noticed have helped me become a better home roaster.
Do you track anything different with your home roasts? Let me know in the comments section!