An Exhaustive, or just Tiresome Guide
You can roast coffee at home?
Yes, you can roast your own coffee at home! It’s an easy process, and you’ll find that you can make better coffee than you can buy pretty much anywhere.
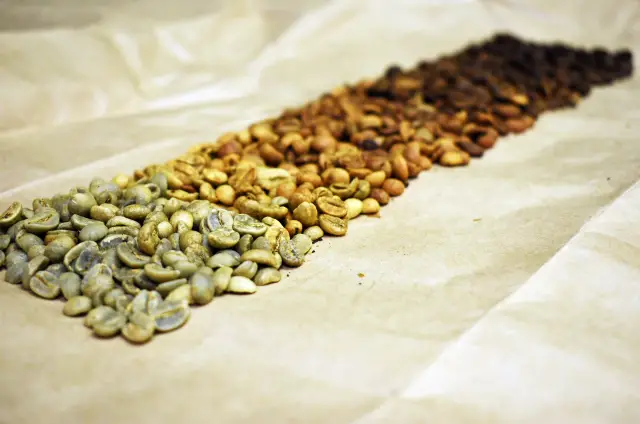
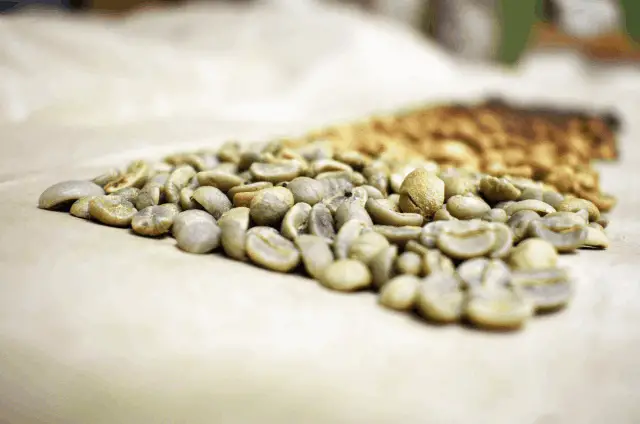
Coffee starts as a seed in the pit of a coffee fruit. The fruit is removed by various methods of fermentation and the green seeds are left to dry. After reaching a certain level of dryness, the seeds are then sorted through and shipped across the world.
As a home roaster, you’ll start roasting somewhere between 50 grams and a half pound per roast. During the roasting process, you’ll find the green coffee seed go from green and raw to yellow, first crack, light, medium, second crack, dark, and French roast. Beyond that, you’ve overdone it!
After you’ve roasted your coffee, you let it rest for a day or two, and you’re ready to enjoy truly fresh coffee. There’s nothing like it.
Why would you roast coffee at home?
There are many reasons why you should start roasting coffee at home. First, and most important, is that roasting your own coffee is awesome. Through learning, you’ll become closer to something that you enjoy probably every day. There is an intense satisfaction in knowing that you’ve created something that others can enjoy.
I started roasting coffee as an offshoot of brewing beer. I happened to see green coffee on the shelf and was intrigued. Five years later, I quit my job and became a full time coffee roaster. If you’re the kind of person who loves to do it yourself, or to dive into life’s small pleasures, I recommend roasting coffee at home.
What is the coffee roasting process?
Coffee begins as a raw, unroasted seed. In roasting, we’ll be bringing the temperature of the ‘bean’ up to a temperature between 350 and 450 degrees F.
When we apply heat to the coffee bean, complex molecular chains begin to break, creating sugars and flavor acids that are perceptible to the tongue and enjoyable. Maillard reactions occur, browning those newly formed sugars and creating the deep, rich flavors we typically associate with coffee.
After you’ve finished roasting your coffee, you can either drink it right away, or, to let the flavor develop, you can let the beans rest for a day or two.
When you brew your first cup of home roasted coffee, I guarantee it will be difficult to ever go back to store-bought coffee. Freshness is the biggest defining factor when it comes to good coffee. With store-bought, you never know when it was roasted, but you can be fairly certain it wasn’t roasted just two or three days ago. To consistently get that freshness, you need either have a lot of time and money, or roast your own at home.
What do I need to get started?
At its most basic, all you need is some green coffee beans and a cast iron pan. I will admit that I’ve never roasted coffee on a baking sheet or a frying pan, but I did start my coffee journey roasting on a stovetop popcorn popper.
I only did a few roasts using the stovetop popper before I moved on to an electric popcorn popper. While you aren’t able to roast a ton of beans in an electric popcorn popper, you will be able to roast enough for a few days. What’s great about that is if you drink coffee every day, just supplying yourself with your morning cup will force you to get two or three roasts under your belt per week. You’ll learn how different roast levels really change the flavor of your coffee, and you’ll begin to understand how different coffees react to the roasting process.
You’ll probably also want something better than a Mr. Coffee pot to brew your coffee, and you’ll want a grinder. There’s no need to go crazy fancy on either of these elements, though. When you’re starting, just start off with a cheap blade grinder and a French press or a decent pour over cone.
Eventually, my guess is that you’ll upgrade all of these elements, but you don’t need much to get started and make some of the best coffee you’ve ever tasted in your life.
How much will it cost?
Coffee roasting can be an inexpensive hobby.
Top quality coffee sells around $7/pound. I’m talking about some coffees that can absolutely become the best cup of coffee you’ve ever had in your life. Some green coffees are more expensive, but many high quality beans sell in the 5’s and 6’s.
Beginning roasting methods like popcorn poppers are inexpensive, too. Stovetop and electric popcorn poppers are between $20-$25.
If you already have a grinder and a brewing method, you’re all set to start roasting. If not, you’ll want these, which can both be found for around $20.
That means, if you have absolutely no tools whatsoever to even make a cup of coffee, your starting cost is around $75. If you can grind and brew yourself, you only need $30-40 dollars to start.
Of course, as you continue to roast coffee, you’ll find that you want to gain more control over the process, and you might want to invest more in a better roaster. You can spend a lot of money roasting coffee, but you definitely don’t have to. I roasted coffee with an electric popcorn popper for probably two years and learned so much about making a great finished cup.
Is it cost effective at all?
| Folgers, or other similarly terrible coffee | ~$6.50/lb |
| Starbucks, and other huge national brands | ~$14/lb |
| High quality, third wave local coffee | ~$20/lb |
| Top quality green coffee | ~$8.50/lb |
Note: The Highest Quality Green Coffee is around $8.50/lb roasted- this takes into account that beans cost $7/pound, but you lose ~20% of the weight through the roasting process, which boosts the price per pound.
How quickly does home roasting pay off?
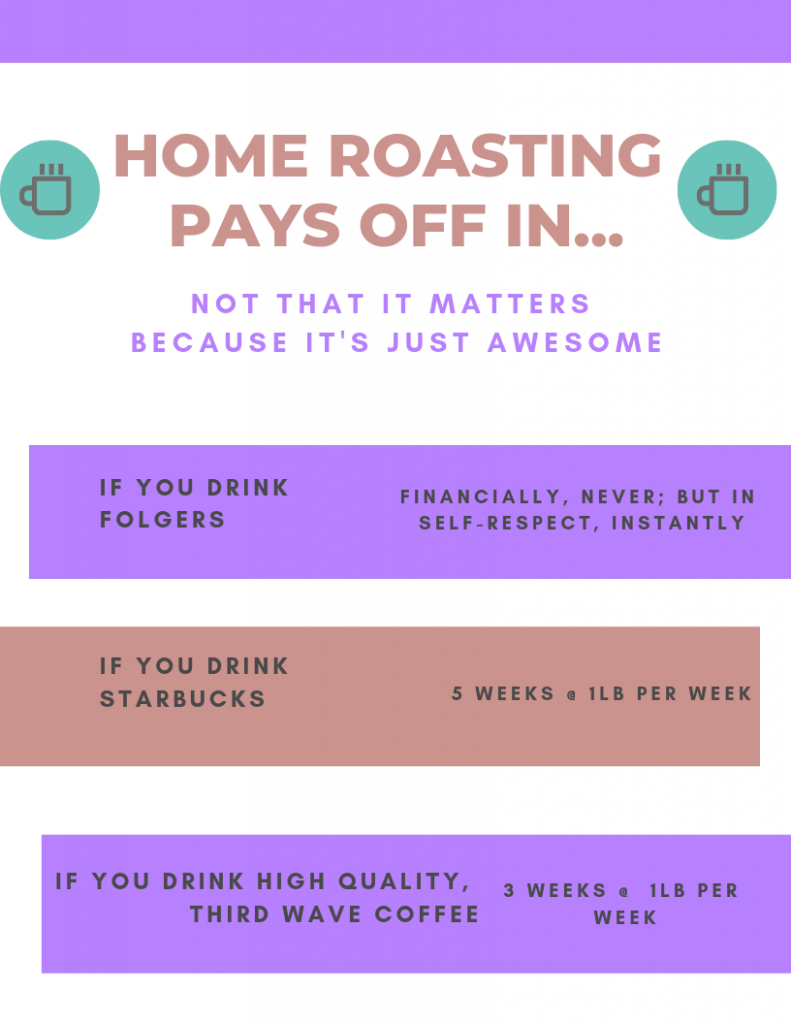
If you drink Folgers: Never, but they use horrible, awful beans. I’m sure at some point I’ll receive a letter telling me to take this down, and I’m not backed by any science that I know of, but: I’ve seen what low quality beans look like; moldy, bug-eaten, etc. and though these will get you an inexpensive cup, I wouldn’t want to drink it even after all of that has been roasted off. Maxwell-House, Folgers, and basically any mass-produced coffee that costs under $10/pound relies heavily on these beans. So while home roasting will never be more economical than Folgers or Maxwell-House, sometimes it’s worth paying a bit more.
If you drink Starbucks: It takes 5 weeks of roasting in a popcorn popper to make the switch to home roasting more financially sound than buying your coffee pre-roasted. This assumes that you use about 1lb of coffee per week, which is fairly typical in a house with two people drinking two or three cups every day.
If you drink a Third-Wave roaster, such as Stumptown, Counter Culture, or Intelligentcia: It will take 3 weeks to pay off your investment. Plus, if you already enjoy these roasters, part of what you’re paying for is the knowledge and care they put into their sourcing and roasting. That means that you already value all the aspects of great coffee, so why not dive in and save a bit of money?
Types of Coffee Roasters
Let’s take a look at the different types of coffee roasters there are. If you’re just starting, as I’ve mentioned earlier, I recommend you start in the beginner stage. This will help you realize how committed you are to the hobby before making any serious cash investment. It’s fun, easy, and you’ll be able to taste the difference right away.
Beginner
Just getting started
- whirley pop
- popcorn popper
- cast iron pan
Established home roaster
You love roasting coffee and people are starting to ask for it as birthday and holiday presents. You’re getting tired of roasting 50g of coffee three times a week and just want to do a half pound at a time. You want more control over your roast.
Drum Roasters
- Behmor 1600
- Hot Top
- Gene Cafe Roaster
Air Roasters
- Fresh Roast
- Nesco Coffee Roaster
Looking to go pro?
You’ve been roasting for a while and you’re ready to put some serious money down. You are thinking about turning your hobby into a profession, or you’re thinking about selling some of your fresh-roasted beans as a side-hustle. Or, you just really, really want to be a home roasting boss.
- Allio Bullet
- Commercial Sample Roasters
A very simple guide to green coffee origins
South America
South American coffees range a ton in quality. At The Home Roast, I’ll only be talking about high quality beans, most of which are sourced from Sweet Marias. South American coffees generally tend toward heavier body and a nuttier taste. Brazilian coffee is typically dry process, which leads to a less-clean, but full bodied cup. Colombian and Peruvian coffees have a bit more acidity and brightness to them, but to generalize a continent, these coffees tend toward nutty.
Central America
Central American coffees are more acidic than South American coffees. Here, you mainly have washed-process coffees, which have cleaner, brighter flavors. Central American coffees are fun to roast because with these, you can really start to tell how roast levels truly affect the taste of your coffee. A light roast will highlight the citrus of a Guatemalan coffee. Take it darker, and you will start to taste the chocolate flavors. They taste great roasted anywhere on the roast spectrum.
Africa
African coffee is my personal favorite. It tends towards a bright and acidic cup with very unique flavors. Kenya coffee is renowned in the roasting world for its versatility, and Ethiopian coffees are known for their incredible fruit-forward characteristics. All the way down the continent, there are intense fruit and floral flavors that are particularly suited to lighter roasts, but also work when roasted darker.
Indonesia
Indonesian coffees are typically dank, musty, spicy, and herbal. This is the region you want to look at if you’re going for more roasted flavors and trying to hit that typical dark roast. These coffees are inky and rich. They make good additions to blends, and have really unique flavors unto themselves. In my personal experience, Indonesian coffees tend to be less refined than Central and most African coffees. Part of this is due to the processing method used in most of Indonesia, which we’ll get into later.
A very simple guide to coffee roast levels
Before we dive into roast levels, I need to briefly explain two roasting terms: 1st crack, and 2nd Crack.
1st Crack
1st Crack: As coffee is roasted, the bean goes through a series of chemical changes. At some point, a large amount of steam is released and a portion of the internal bean structure expands so rapidly, it explodes. This is called first crack. The beans begin to release their chaff and begin to look brown. 1st crack is seen as the bare minimum for roasting before grinding and brewing. I can’t say I’ve ever tried coffee that wasn’t roasted to 1st crack.
2nd Crack
2nd Crack: After 1st crack dies down, there is a period of 2-3 minutes where the coffee continues to develop sugars and browns further as Maillard reactions occur. At a certain point, a much more faint, but grouped together series of pops begin to happen. This is called 2nd crack. It sounds like pouring milk into a bowl of rice krispy treats. At 2nd crack, we begin to go into dark roasts. You can continue past 2nd crack, but if you push too far beyond it, you will have burnt, carbonized coffee.
Light-Medium-Dark-Extra Dark
Coffee displays different characteristics depending on roast level. Roasting defines the end cup’s acidity, body, and bitterness. The lighter the roast, the more acidity and brightness you have. Go darker, and you will bring out more sweetness and body from the coffee.
Light Roast
Light roast coffee displays the natural acidity and brightness of the cup. Light roasts pair well with coffees that have strong fruit and floral notes, such as African coffees, Costa Rica, and Colombia. It’s also fun to light roast coffees that don’t typically get the light roast treatment, like Sumatra. Trying things that are ‘out of the norm’ is one of the best ways to learn. Go too light, and you will have a grassy tasting cup that is underdeveloped. The best way to tell if your coffee is underdeveloped is to drink it: you’ll feel an astringent bite on the tip of your tongue.
Medium Roast
Medium roast coffees are all about balance. There is a sweet spot in balancing acidity, sweetness, and body. I believe coffees from Mexico, Guatemala, and Peru all really benefit from a medium roast. These are sweet coffees that sometimes have very unique flavor top notes. It’s nice to preserve those top notes, but to also showcase the full body.
Dark Roast
Dark roast coffees are the norm here in the US. Even Starbucks light roast is a dark roast. Coffee starts to show its oils at this point, and you begin to replace some of the natural flavor of the coffee with roasted notes. This isn’t necessarily a bad thing, and some coffees really benefit from the extra heat. Typically, Indonesian coffees are roasted dark. I would say that a coffee is a dark roast if you begin to hear the second crack.
Extra Dark or French Roast
Extra Dark roast coffees are frowned upon in the 3rd Wave, new-age of coffee. This is because at an extra dark roast, you are no longer highlighting any of the characteristics of the coffee, and are instead just going for roasted flavor. At this point, there is very little flavor difference between an Indonesian and African bean. Either way, it just tastes roasty. There’s a time and place for the extra dark roast. If you’re going for this style, be careful not to push it too far: you’re getting close to burnt coffee.
City, CityPlus, Full City, Full City Plus, French Roast
This is another way to view the roast spectrum, and it’s the roast spectrum identifier most often used among roasters and other coffee folk.
As you hit 1st crack, you begin to caramelize sugars and you exchange brightness and acidity for body and bitterness. This is the fun of roasting coffee. Each bean has its own unique attributes: part of your job as the roaster is to discover what the bean has to offer and then to highlight that.
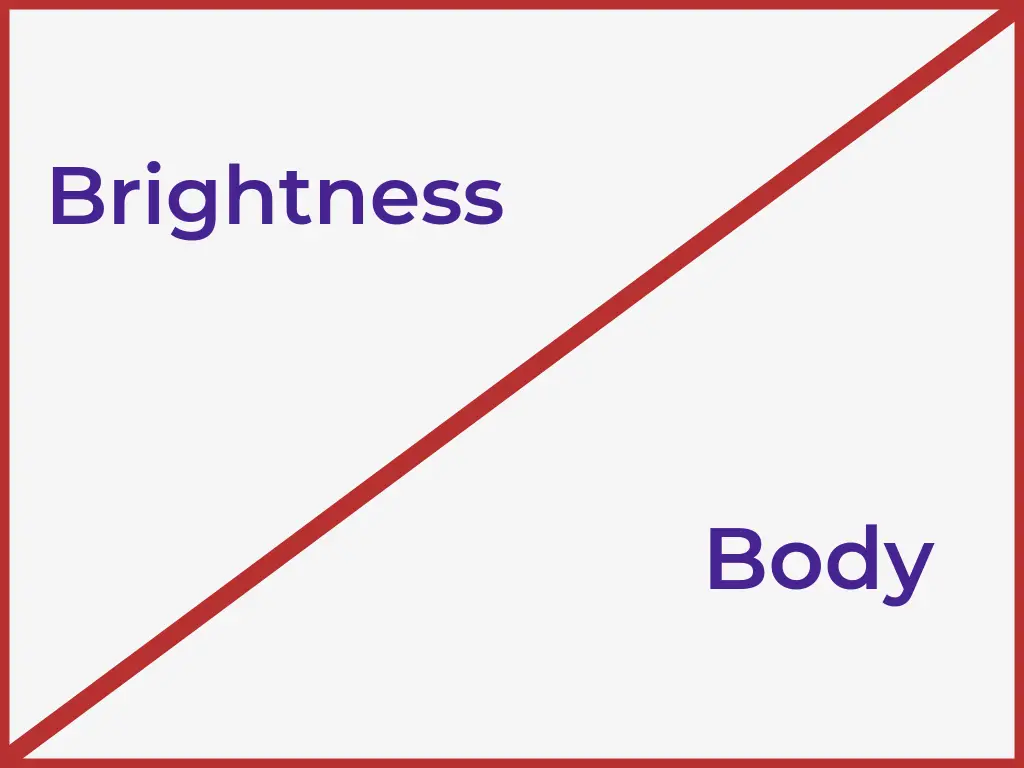
As you roast, brightness dims and body increases 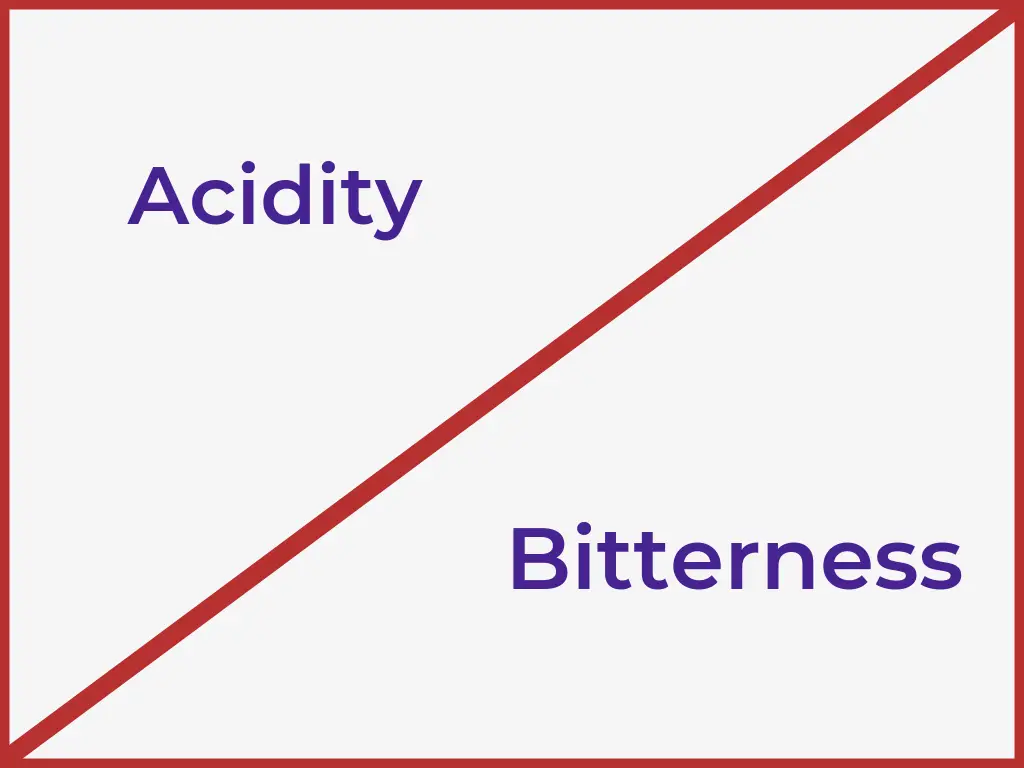
As you roast, acidity decreases and roast bitterness increases
A very simple guide to coffee processing methods
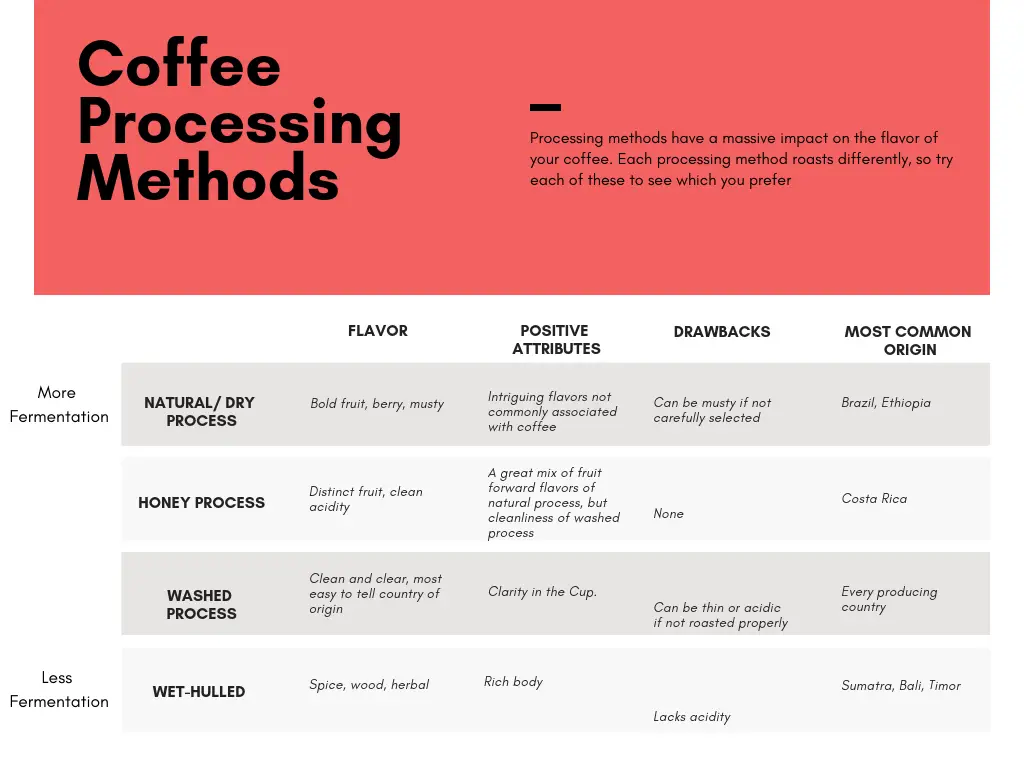
Washed Process
Washed Process coffee is most common among specialty grade coffee. The coffee fruits are put into vats of water and left to ferment for a short period of time. The fermentation allows the fruit to release the seed inside: our coffee! The coffee is then washed of the pulp. This processing method allows for cleaner flavors in the cup.
Natural/Dry Process
Natural or Dry process coffee is sort of a wild-card. The coffee fruit is dried out on beds under the sun, so the fruit ferments with the seed inside as a contained unit. Natural, or dry process coffees can taste musty or dirty if the fruits are not turned often enough, but if you can find a natural process coffee from a source you trust (not hard) these are packed with wild fruit flavors that you may have never suspected from a coffee. If you’ve ever tried an Ethiopian coffee that tastes like blueberry pie, it was probably a natural or dry process coffee.
Wet Hulled
Wet Hulled process is used often with Indonesian coffees, where Dutch colonists set up coffee mills. Wet hulling involves removing the coffee fruit from the seed very early on, only after a short fermentation. The fruit is blasted by a sharp ‘blade’ of water, thus destroying it and removing the seed. I always think of Indonesian coffees like this: they had a rough life early on, so you have to treat them with extra care as you roast them. Then they’ll be sweet and wonderful. And then you grind them and pour boiling water on them.
Honey Process
Honey Processed coffee is a middle-ground between washed process and natural or dry processed coffee. The great thing about honey-processed coffee is that any processor who is doing this with their coffee is doing it specifically for flavor and they’re doing it with a lot of care. It’s a very difficult processing method and requires focus and attention. The fruit is left to naturally dry until a certain point, when it is then put into tanks to ferment and wash the seed out.
How to get the most from your home roast (brewing and grinders)
French Press
The french press is a classic, and it makes pretty great coffee. French press coffee has a lot of solids left in it, so this cup of coffee with have a lot of sweetness and body in it.
Pour over
Pour over coffee is a much cleaner cup than a French press. If you measure out your coffee right and give some care and attention, the pour over method is the best way to get a dazzling cup of coffee that really showcases your home roast and impresses the people.
Espresso
Espresso is extremely concentrated coffee that’s been pressure blasted with hot water. It’s a great method of drinking coffee, but you really need a high quality machine to do it right. This is a whole other rabbit-hole to go down.
Grinders
Grinders are really important when it comes to your coffee. The goal is to have the most even grind possible. While blade grinders work, they struggle with consistency. Burr grinders are the best for making an even bed of grounds, thus ensuring you’re evenly extracting flavor.
Roasting for your Brew Method
French Press
If you’re roasting for a French Press, go a bit darker. Since French Press is a bit more ‘dirty’ in the sense that you are leaving a lot of coffee solids in the cup, choose a coffee that benefits from heavy body– like an Indonesian or a natural African.
Pour Over
I like pour over coffees on the lighter end of the spectrum. Because the pour over method highlights acidity and brightness, accentuate your bright centrals and African coffees and really let them shine.
Espresso
Roasting for espresso is tough. Because the extraction method is so intense, your roast needs to be great to ride the balance between acidity, sweetness, and bitterness. I typically roast darker for espresso, but never in to 2nd crack. Espresso is also where you can really start to have fun blending beans together, trying to mix the characteristics of each for a perfect cup.
Beginners tools for a better roast
Digital scale
Every kitchen should have a digital scale. These are awesome, and they’ll help you ensure that you’re getting a standardized amount of coffee per roast. If you keep track of your roasts, you’ll be able to learn more from the process.
Log notebook
Speaking of keeping track of your roasts: a log notebook! This can be an actual roast log, or it can be a notebook. You should keep track of at least these factors: Green Coffee, roast date, weight going in to the roaster, roast time, time at 1st crack, time at 2nd crack (if you get there). There is a lot more to log if you want to get wayyy into the details, but this information is enough to help you build your skills.
Timer
Timers help. A lot.
In-Depth tools for taking your roast to the next level
Roasting software
If a simple notebook isn’t enough, roasting software can help you get serious with roast analysis. Software will help you determine and control roast characteristics like Rate of Rise. I wouldn’t worry about this when just getting started, but I thought it’s helpful to note here so you can know what the deep end of coffee roasting looks like.
Cupping Supplies
Cupping is a method of tasting coffee that better helps you understand the flaws and beauties of your coffee. If you ‘cup’ multiple coffees back to back, you can really begin to taste the difference in regions, varietals, and roast levels.
Terms and Concepts that will help you make a better roast
Rate of Rise
Rate of Rise is simply the rate at which your coffee beans are heating up as they roast. There are all sorts of theories on how you should control this, none of which are important for the home coffee roaster just getting started. But, again, as you get more into your home roasts, understanding this concept will help you take your coffee to the next level.
Understanding Bean Density
Bean density is helpful to understand. Good green coffee suppliers will tell you what the bean density is already. You don’t need to know anything about bean density before starting, but you should know this: a dense bean can take more heat without scorching. Dense beans typically have more flavor. As you roast more, you’ll learn what you like and dislike.
Try these!
Check out top regional roasters to help you see what’s possible!
The big ones: If you can find Stumptown, Intelligentsia, or Counter Culture, give it a shot! These are big roasters now, and they’re all over the country. They buy great coffees and they treat the brewing process with a lot of care.
I also recommend finding a good third-wave coffee shop, or a local roaster. Just having a brief discussion will help your understanding a ton. It’s hard to know what flavors are possible in coffee unless you try many different types. That’s why sampling different coffees over the course of a few weeks at a local shop can be helpful.
That’s it
As I said, this is more information than you need to get started, but you should bookmark this page and come back to it. Use it as an information source; come back to it over and over and work on understanding the concepts as you work your way down the list.
Really, all you need to roast coffee is a heat source and some green coffee. Start there. I guarantee you’ll have fun.
For more info on green coffee, go here. Want tips on improving your roast? Go here. If you want to serve better coffee, check these articles out.