
If you’re at the stage of your roasting hobby where you’re making great coffee at home, but you want to find a way to experiment a little more, it’s time to look into coffee roasting profiles.
What is a Coffee Roasting Profile?
A coffee roasting profile is your way of expressing a beans characteristics, whether that’s highlighting its natural acidity, or playing up its sweetness and body. As you continually roast a bean, you will find characteristics that you enjoy, and profiling is a data-driven way to try and reach that perfect cup.
A coffee roasting profile is a style of roasting coffee. At its simplest, you can define a coffee roasting profile as the degree to which its roasted, i.e. dark roast/ light roast.
If you haven’t already tried roasting the same bean to different degrees and tasting the differences side by side, start there! There is so much to learn about the balance between acidity and sweetness from that exercise alone.
More in depth, a coffee roasting profile refers to the way the coffee was roasted, so you’ll take a look at variables like heat of the roaster when adding the beans, time of roast, how much heat was added during the roast, first crack, airflow, and so on.
All of these different variables affect your roast. As homeroasters, we often don’t have any control over many of these variables, such as airflow or drumspeed. However, that shouldn’t stop us from controlling what we can to get a better roast every time!
Two Ways of Viewing a Coffee Roasting Profile
There are many ways you can ‘profile’ a coffee.
One of the most helpful ways of understanding the effect of changes made during your roast is to chart it out visually. Give your profile a shape.
Visual Tracking
If you use software, like Artisan or Cropster, the visual component will be done for you. However, these programs require adding in digital thermometers and setting up a computer to log your data, which isn’t always practical for home roasting.
You can plot out your coffee roasting profile the old school way with a graphing notebook and a pencil, too. In fact, you can dedicate a whole notebook for your coffee roasting log and keep your cupping notes and roast data all in the same place.
If using a machine that allows you to read temperature, record your temperature every 30 seconds. Plot that number out on a graph that measures temperature vertically and time horizontally. You’ll get something that looks like this:
[[insert a visually plotted graph]]
Having the data in front of you will help you understand how much your changes affect the roast.
Rate of Rise Tracking
If you don’t want to fork out the cash for a graphing notebook, you can also just log the Rate of Rise in a regular notebook. Take temperature readings every 30 seconds and note how many degrees your roast is rising per measurement.
If your roast is rising 7 degrees every thirty seconds, you have a 7 second Rate of Rise (RoR). As your coffee starts yellowing and moves toward first crack, you can lower or raise that RoR to alter your coffee profile.
Rate of Rise tracking might look something like this:
[[Insert an image done with RoR Tracking]]
Coffee Profiling for Knowledge
You must also taste the coffees side by side. There is no point in roasting to different profiles if you don’t go through a tasting process to learn how those changes affect the flavor of the coffee.
As with all things, you’ll have to gather some data and try profiling a few different times before you really start to glean any valuable information from it.
How Coffee Roasting Profiles Affect Flavor
There is a good amount of science done on this subject, but really, this is pretty uncharted territory (pun intended). Specialty and Third Wave coffee roasting is still relatively new if compared with, say, specialty beer brewing, which has been around for hundreds, if not thousands of years. Don’t buy it? Take a look at what Belgian monks have been up to for the last few centuries.
As a general and very cursory rule, the sharper your Rate of Rise, the sharper your coffee will be; the smoother your Rate of Rise, the smoother your coffee will be.
There are good and bad flavors on both ends of the spectrum.
If you bring your beans up to first crack very quickly and keep the heat going throughout, creating an ever-increasing Rate of Rise, you’ll end up with an acidic and underdeveloped cup of coffee. Even if you roast dark, you’ll still end up with bitter, acrid, and acidic flavors.
However, if you roast too slowly and gently lower your Rate of Rise throughout and roast a coffee for 20-25 minutes, you’ll end up with a baked coffee that tastes completely flat. There won’t be anything special to it whatsoever.
Find the Balance
The key is to be somewhere in the middle and to learn what balance is right for your coffee beans.
Different Roasting Profiles for Different Beans
As a disclaimer, this is how I like to roast these coffees, and I highly encourage all readers to try a few different methods out with all of these beans to learn what you enjoy.
As with this Ethiopian, some beans exhibit different wonderful characteristics when treated differently. Ethiopian beans have great sweetness and body to them when they’re roasted a bit smoother and darker.
However, I rarely go for that profile, just because I prefer their unique and interesting acidity. The same idea goes for all coffees. They have multiple characteristics– learning how to highlight what you like is what learning to roast your own coffee at home is all about.
African Roasting Profile
Good Ethiopian coffee beans are dense and can be treated with a good amount of heat. I use as much heat as my roaster can offer. I’ll keep maximum heat on throughout the yellowing and into the browning stage. As first crack approaches, I cut the heat down to 50%. I usually let the beans continue to roast either 1:00 or 1:30 after first crack has really started. Then I cool the beans as quickly as possible.
By keeping the heat high throughout the whole yellowing process, I’m trying to bring out the acidity of the coffee. I cut the heat down to 50% as I approach first crack because I don’t want underdeveloped coffee. I still want some sweetness to balance the acidity, but I don’t want it to be the main flavor.
Central America Roasting Profile
For Central American coffees and for dense South American coffees, I like to aim somewhere in the middle for a medium roast. Centrals and dense Southern coffees have great body and really interesting tobacco, earth, and chocolate notes in them toward the sweet side of things, but can also be really surprising with citrus, cherry, and apple acidity.
Sometimes it’s hard to choose what you want to go for with these coffees. These take the longest to dial in, in my opinion, because there are so many different, wonderful cups of coffee to be made depending on what decisions you make while roasting.
Indonesia Roasting Profile
Indonesian coffees like Bali, Sumatra, Sulawesi, and to a certain extent Indian coffees are best treated gently. They have very earthy and some spicy flavors to them that come out a little later in the caramelization process. A lower and slower roast helps bring out their sweetness and really boosts the body of these coffees, which is their main appeal.
If I’m giving someone a pound of coffee and I know they love cream or milk in their coffee, I give them an Indonesian coffee. I’ll roast up until just at the first hints of second crack, stopping just at the point of maximum sweetness and trying to avoid the roasted bitterness. There won’t be much acidity left in the cup at this point, but I know the milk/cream will be the balance.
Natural vs Washed Roasting Profile
Naturals and Washed coffees should be roasted differently, too. Because they’re processed differently, they react differently to heat.
Natural process coffees, honey process included, have more natural sugars packed in them. Because of this, they caramelize faster. Letting a natural go for a minute and a half after first crack will yield a darker bean than letting a washed process coffee go for the same time.
In general, I like to slow natural and honey process coffees down in the yellowing phase, letting them develop their sweetness, and then end the roast pretty soon into first crack to preserve the fruit-blast acidity.
With washed process coffees, I like to pump as much heat as possible up front, all the way until just before first crack. At that stage, I’ll know whether I want to extend farther toward second crack for a sweeter coffee, or if I want to keep it short and closer to first crack for a more crisp cup.
Examples
For instance, let’s take a look at two roasting profiles side by side in a 3 Kilo Primo.
Note: the times shown here are a bit longer than I would like, by about a hefty 20%. However, these roasts were done in a production facility, and I wanted to try and mimic the time spent roasting on a Behmor 1600 or other home roaster, which generally take a bit longer than professional gas heated roasters.
In the first, I’m going to shoot for maximum acidity. In the second, I’m going to go for the opposite and aim for sweetness.
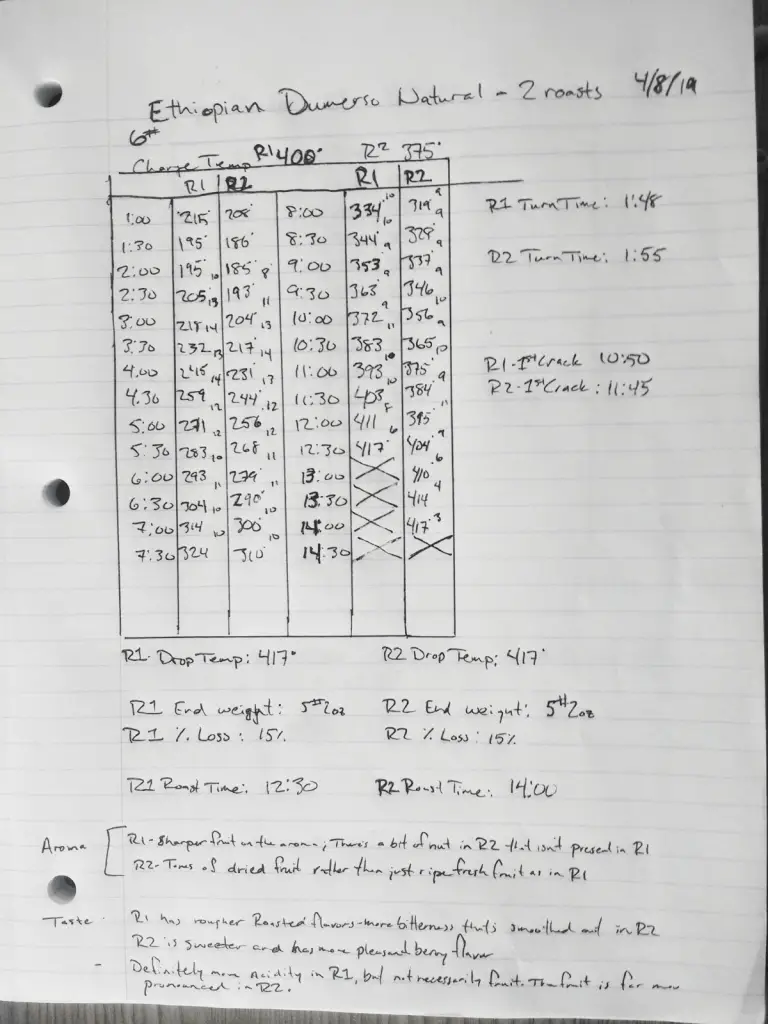
The charge temp for the 1st roast was at 400 degrees. That’s marked up at the top. The charge temp for the 2nd roast was 375.
As you go down the columns, you can track how one roast varies from the other. With the way I’ve set up my side-by-side roasts, I can look to see how my rate of rise is changing at different points during my roast.
For the second roast, I made two significant changes. First, I slowed down the yellowing and browning process. Second is that I dragged out the time after first crack a good deal. The second roast, despite the fact that it came out at the same temperature, was a whole minute and a half longer than the first.
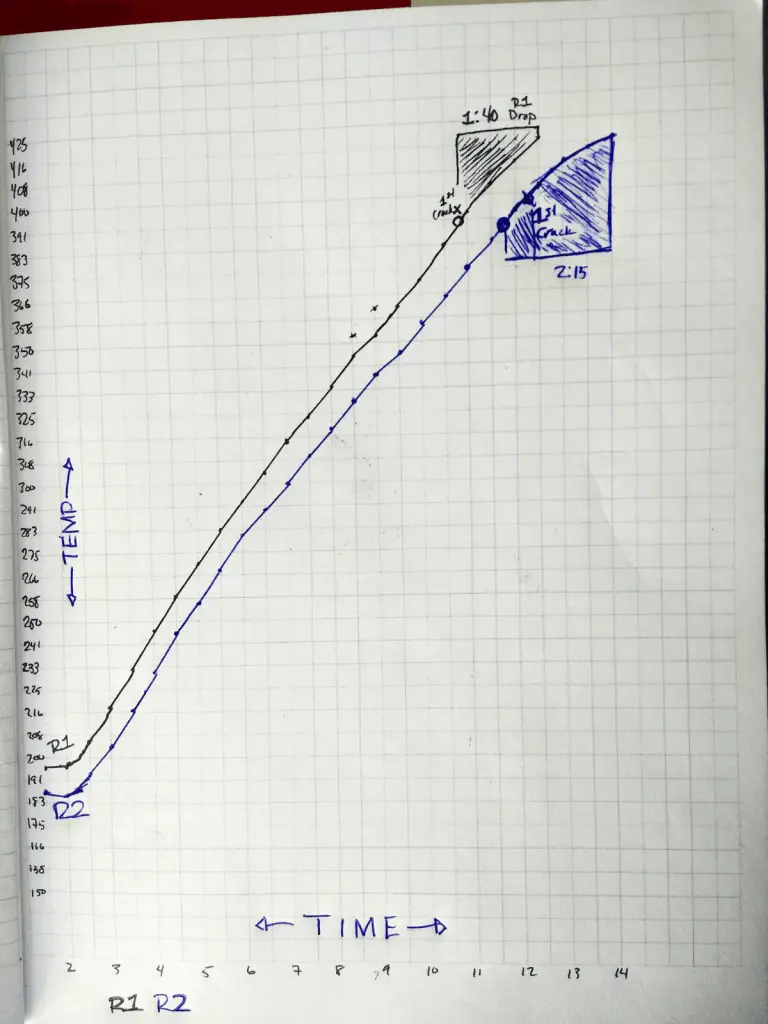
Here is what the roasts look like visually plotted out on graph paper, side-by-side.
It’s a lot of work to track all of these variables by hand. While there is free software like Artisan available, there is the additional step of setting up your thermocouples and the digital converter for your computer. A simpler way to digitally log your roasts, though slightly less convenient in the long run, is to put your data into a Google Sheet.
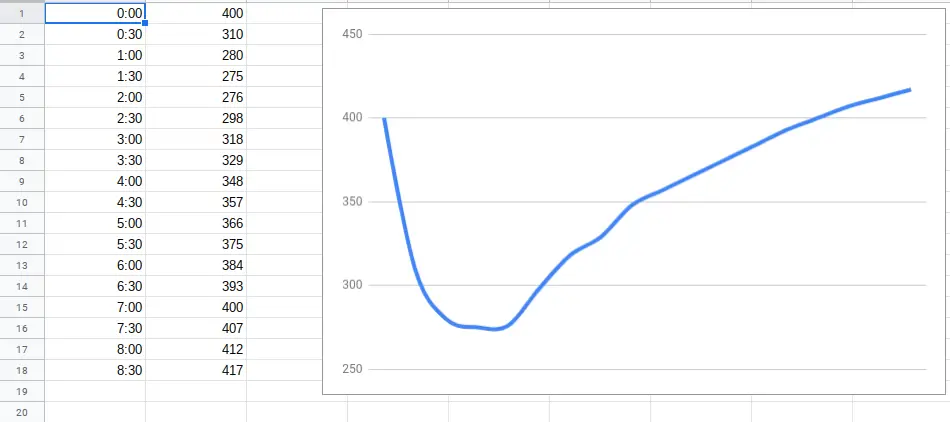
While there are no automated tools to mark when 1st crack is, or how long the yellowing process is, Google Sheets is a simple way to log your data roast to roast.
Another benefit of using Google Sheets is that it would be easy to copy and paste data from an older roast and compare it to your current roast. At that point, accessing your old roasts is as easy as you make it: all depends on your digital organization!